

Back in February, I shared a culinary goal I set for myself this year: to make a multi-tiered cake. After years of watching cake competitions and cake reality shows, and after growing up watching my mom bake and decorate beautiful cakes, it was time I dive in and give it a try.
As with many goals I've set for myself in the past, I spent the past few months without getting past the first step - buying the stuff. I can't tell you how many projects I've purchased the gear for, but never seen them through. But this week, I changed that - at least for this goal.
Our Mother's Day celebration w/ Dan's family got shifted to Saturday, and I was asked to make dessert - but not given any specific request. I took that as my opportunity to push myself and accomplish this goal. I had all the gear I needed, so I stocked up on flour, sugars, cocoa, egg whites and vanilla extract, and started doing my research.
Given the number of guests, I found that two tiers would be more than enough, and would allow me to do a different flavor in each. Although the recipes and techniques I used were all from Confetti Cakes For Kids
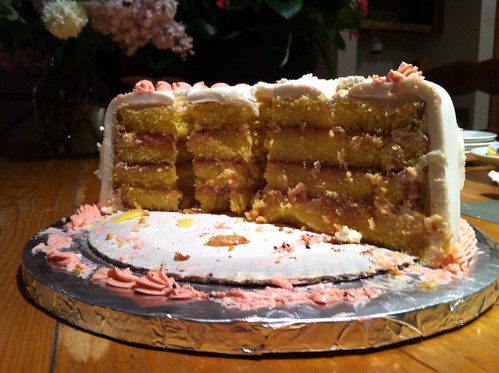
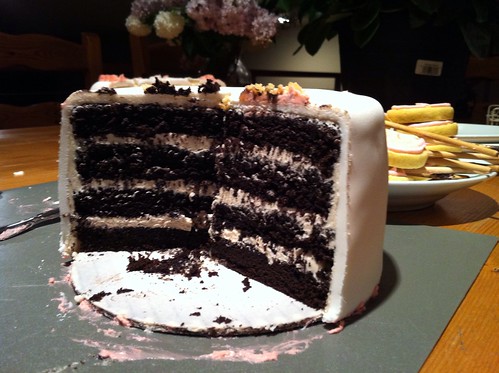
Next I got to put my new revolving cake stand, using it to help trim the tops off and cut each of the 4 cake in half, creating four layers for the bottom cake, and four for the top. Using a piping bag, I created a dam of frosting all around each layer of the yellow cake, filling in ('torting') with the rhubarb jam, then adding the next layer. Once the top layer of yellow cake was on, I did a crumb coat (a thin layer of frosting over the entire thing, then wrapped it in cling wrap and put it in the fridge. I repeated those steps with the chocolate layers, but filling them with more frosting rather than jam. There was enough trimmed from the chocolate cake that I got to taste it with a little frosting, and it reminded me of an Oreo cookie.
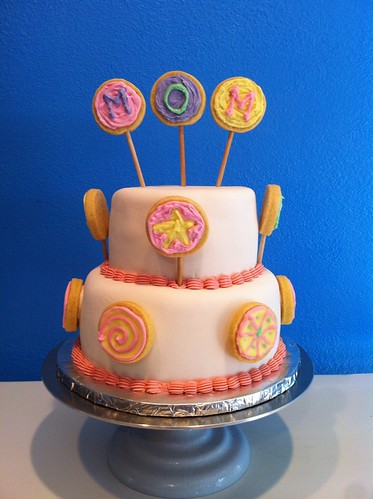
I also made a batch of sugar cookie dough using a recipe from the book, and after resting in the fridge overnight, baked little circles - some with wooden lollipop sticks in them. Using royal icing (yet another recipe from the book), I decorated them. My intent was to use flooding techniques and get smooth, pastel colored icing on each cookie - but I failed to re-read the section on flooding and didn't realize I needed to water down the icing to use it in that way. I figured this out after most of the cookie pops and cookies were done, but did get to try a little of it. Next time they'll turn out much better. I did three pops that spelled out M-O-M and four more with hearts and stars - all in pastel yellow, pink, green and purple.
The morning of, I pulled the cakes out of the fridge, did a little trimming and adjusting with frosting, and inserted dowels in the bottom tier (to support the top tier). My first dowel (actually hollow plastic tubes) was cut a little long, so I had to pull it back out. This turned out to be a blessing in disguise, as it gave me a core sample from the rhubarb-filled yellow cake, confirming that even after a few days in the fridge, it stayed moist and delicious.
Support structure in place, I got to kneading the fondant. I used store-bought fondant, and it was very easy to work with. To keep things simple, I didn't try tinting it. I wasn't sure how much I'd need for each layer, so thought it best to keep it all white while learning. This proved a good plan, as I ended up with much more fondant than necessary when I covered the top tier. Everything went pretty smoothly with both tiers, and the 1/4 inch thick fondant (the advice in the book) covered a multitude of bumps and lumps in my cakes, and the results were two smooth, white tiers.
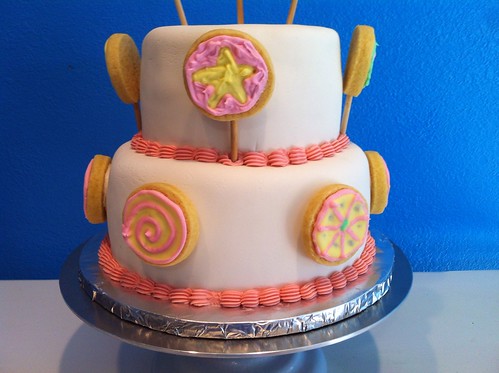
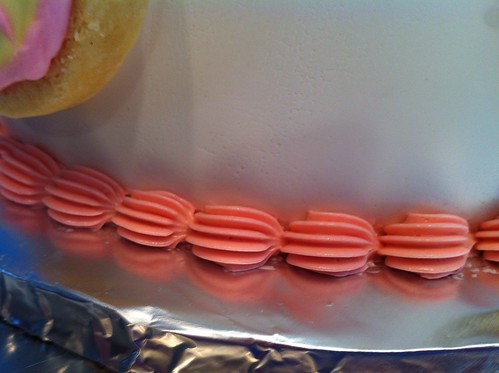
A few dabs of royal icing secured the top tier to the bottom, and allowed me to attach the cookies around the bottom layer. I also put the pops in the tops of both layers, with "MOM" on top. Last but not least, I added pink food coloring to the leftover frosting, and piped a border around the base of each layer, to cover the seams.
I made some mistakes along the way, and learned a lot, but in the end, the cake turned out great. It was something I could be proud of, and was enjoyed by everyone. Our nephews both took pictures, and Blake posted one in Instagram... accruing a 'like' in less than 1 minute.
Some of my other goals for the year are not culinary, but this has inspired me to push myself more in and out of the kitchen. I strongly recommend Elisa Strauss' books


No comments:
Post a Comment